Today we continue our journey into the Linux world and the Apache configuration. We touched on this topic in the following posts:
- Install Ubuntu Server as VirtualBox guest
- Install LAMP in Ubuntu Server
- Add a new website to an Apache installation
So now, in short, we have seen how to install Ubuntu, how to install a LAMP server in Ubuntu and, finally, how to add a new website in Apache. But there is another step we have to take to make the installation of our website complete: run it using an SSL certificate.
Putting your site under SSL is now a must, both for security and confidentiality reasons, but also because in the absence of an https connection your site could be penalized by search engines. So, it’s time to start!
Create a self signed certificate
You will probably never use a self signed certificate in a production environment, but here we only want to demonstrate how to install an SSL certificate in an Apache website. So for our purpose it’s ok.
To create an SSL certificate, go to your Linux terminal (as in previous posts I’m using Ubuntu Server 20.04) and type the following commands:
sudo openssl genrsa -aes128 -out /etc/ssl/private/mytestsite.com.key 2048
With the private key just created, we can create a certificate request (the famous CSR). Type the following command in your Linux terminal:
sudo openssl req -new -days 365 -key /etc/ssl/private/mytestsite.com.key -out /etc/ssl/private/mytestsite.com.csrYou will asked some questions about the certificate:
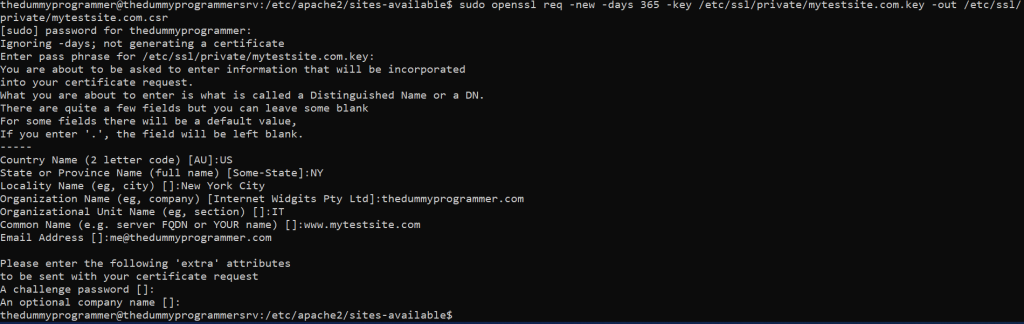
When you are asked to insert a challenge password, just press enter. Otherwise you will be asked for certificate’s password each time you restart Apache.
We are ready to create the actual certificate with the following command:
sudo openssl x509 -in /etc/ssl/private/mytestsite.com.csr -out /etc/ssl/private/mytestsite.com.crt -req -signkey /etc/ssl/private/mytestsite.com.key -days 365
Thats’ it, your self signed certificate is ready to be used. But we still have to do something else…
Enable mod_ssl
As next step, we have to enable the Apache module “mod_ssl”. It is quite simple. Just type the following command:
sudo a2enmod sslRemember that when you change Apache’s configuration, you always need a service restart to make it work. In this case we will restart Apache after the creation of the virtualhost.
Create a new SSL Apache virtualhost
In this previous post, we have seen how to create a new Apache virtualhost. Now we are going to do something similar, but this new virtualhost will be listening on port 443 and will have configured the certificate we just created.
To begin, we can start by copying the file “default-ssl.conf” configuration file to a new configuration file that will contain the configuration of our new virtualhost:
sudo cp /etc/apache2/sites-available/default-ssl.conf /etc/apache2/sites-available/mytestsite.com-ssl.confIn this way we have a starting point on which to configure our new virtualhost. The final result must be the following:
<IfModule mod_ssl.c>
        <VirtualHost _default_:443>
                ServerName mytestsite.com
                ServerAlias www.mytestsite.com
                ServerAdmin webmaster@mytestsite.com

                DocumentRoot /var/www/mytestsite.com/public_html

                # Available loglevels: trace8, ..., trace1, debug, info, notice, warn,
                # error, crit, alert, emerg.
                # It is also possible to configure the loglevel for particular
                # modules, e.g.
                #LogLevel info ssl:warn

                ErrorLog ${APACHE_LOG_DIR}/mytestsite_error.log
                CustomLog ${APACHE_LOG_DIR}/mytestsite_access.log combined

                # For most configuration files from conf-available/, which are
                # enabled or disabled at a global level, it is possible to
                # include a line for only one particular virtual host. For example the
                # following line enables the CGI configuration for this host only
                # after it has been globally disabled with "a2disconf".
                #Include conf-available/serve-cgi-bin.conf

                #   SSL Engine Switch:
                #   Enable/Disable SSL for this virtual host.
                SSLEngine on

                #   A self-signed (snakeoil) certificate can be created by installing
                #   the ssl-cert package. See
                #   /usr/share/doc/apache2/README.Debian.gz for more info.
                #   If both key and certificate are stored in the same file, only the
                #   SSLCertificateFile directive is needed.
                SSLCertificateFile      /etc/ssl/certs/mytestsite.com.crt
                SSLCertificateKeyFile /etc/ssl/private/mytestsite.com.key

                <FilesMatch "\.(cgi|shtml|phtml|php)$">
                                SSLOptions +StdEnvVars
                </FilesMatch>
                <Directory /usr/lib/cgi-bin>
                                SSLOptions +StdEnvVars
                </Directory>
        </VirtualHost>
</IfModule>
Compared to the original file, note the following:
- for the sake of brevity, I removed some comments
- I modified the file specifying the correct path of the website and of the files related to the certificate, so check that the paths specified in your configuration file are all correct, otherwise something will not work!
Also note that, in this case it was not necessary, that in some cases you may have to repeat the directive relating to your website in the virtualhost configuration. the directory directive may be the same as used in the non-ssl version of your virtualhost. So you should do something like this:
<VirtualHost _default_:443>
    ....
    ....
    <Directory /usr/lib/cgi-bin>
        .... your directory options ....
    </Directory>
    ....
    ....
</VirtualHost>
With the file “mytestsite.com-ssl.conf” completed, we can run this command to enable the new virtualhost:
sudo a2ensite mytestsite.com-sslRemember also to restart the Apache service.
sudo service apache2 restartNow if you try to access the address https://www.mytestsite.com from your host operating system, you should see the following:
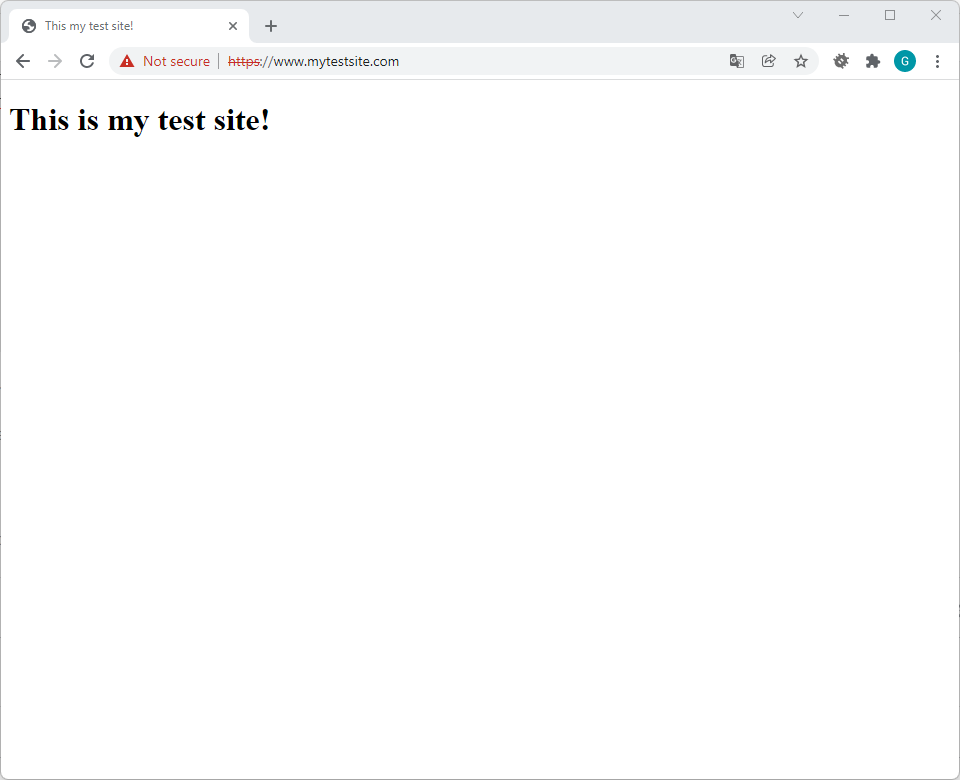
Note that the browser mark the site as “not secure”: this is because we are using a self signed certificate.
Automatic redirect from http to https
You may have noticed that many sites have an automatic redirect to https when you try to access the site in http. To top it off, we want to do this for our test site as well. In one of my previous posts, I already talked about how to redirect a website from http to https. For this to happen, you need as first step to enabled Apache’s module “mod_rewrite”. Just type the following commands in your terminal:
sudo a2enmod rewrite
sudo service apache2 restart
Now we just have to create a “.htaccess” file in the root directory of the website with the following content:
RewriteEngine On

RewriteBase /
RewriteCond %{HTTPS} off
RewriteCond %{HTTP:X-Forwarded-Proto} !https
RewriteRule ^(.*)$ https://%{HTTP_HOST}%{REQUEST_URI} [L,R=301]
After that, trying to access our test website through the http protocol, we will automatically be redirected to protocol https!
It’s been a long post, and I hope you’ve found it useful and enjoyed it.
See you next time!!